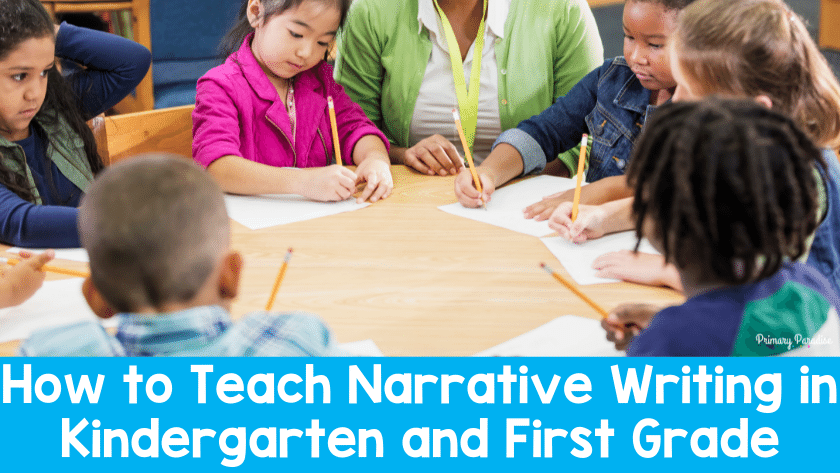
Narrative writing is often one of the first forms of writing kindergarten and first grade students do. This is because writing a personal narrative, or writing about our own experiences, is often less challenging than other form of writing. Still, teaching young children how to write narrative pieces can feel overwhelming. Here is how to introduce narrative writing step by step in a first grade or kindergarten classroom from a classroom teacher.
Are Your Students Ready for Narrative Writing?
Are your students ready to dive into narrative writing? Before you begin writing a personal narrative, it’s important to make sure your students are already comfortable with a few other things. Here are the things to teach before you dive into narrative writing.
- Letter sounds– Your students don’t need to know all of their letter sounds, but they need to know enough so they can easily sound out simple words. If your students can’t yet stretch and tap out some words, they are not ready for this type of narrative writing. Instead, it’s more important to focus on strengthening their letter sound, segmenting, and blending skills. This doesn’t mean they can’t draw a picture of a personal experience and have you write a caption for them (which is a valid form of narrative writing), but having them attempt to write their own sentences without a firm letter sound foundation is simply not a great use of time. So, make sure they have a solid letter sound foundation first.
- Illustrations- Although most students are comfortable drawing, we shouldn’t just assume that they are. Instead, it’s very helpful to take some time to discuss the importance of illustrations. (After all, illustrations enhance the story.) You can explore the illustrations in some favorite picture books, and even take some time to practice drawing different objects, people, and animals. The more details students can convey through their pictures, the easier it will be for them to use those illustrations to support their writing.
- Sentences– Lastly, before diving into narrative writing, it’s important to spend time teaching your students the basics of sentence writing. Do yourself (and their future teachers) a favor, and take at least a full week to develop their understanding of sentences. If you’re teaching first grade, you can even go a bit further if they’re ready for it. (Learn how to teach your students about basic sentences and going further with sentences.)
Step 1: Introduce Beginning, Middle, and End with Mentor Texts
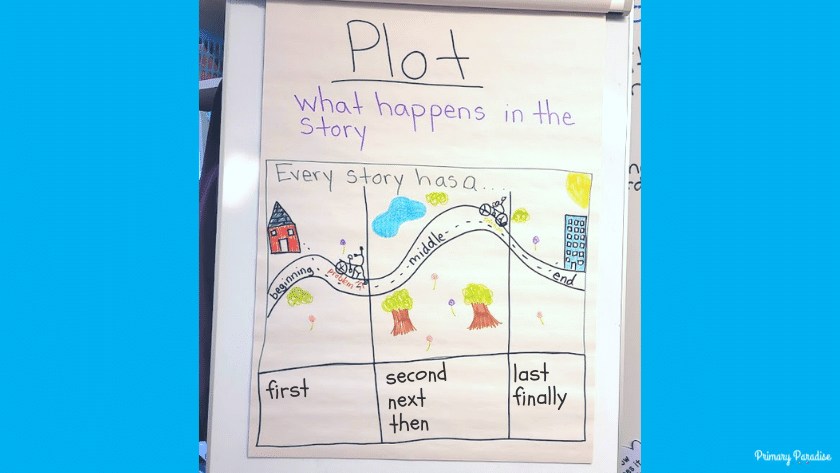
Okay, so now your students are ready to dive into personal narrative writing. The first step is to spend some time reading some mentor texts together. I personally prefer to read realistic fiction texts. Some of my favorites are Jabari Jumps, Jabari Tries, and Anything by Ezra Jack Keats (because who doesn’t love Peter!).
Discuss how every story has a beginning, middle, and end. Make an anchor chart together for students to refer to. Each time you read a story, have students retell the beginning, middle, and end. (Read why mentor texts matter here.) Taking the time to show them good narratives makes it so much easier for them to develop their own.
Step 2: Draw It Out
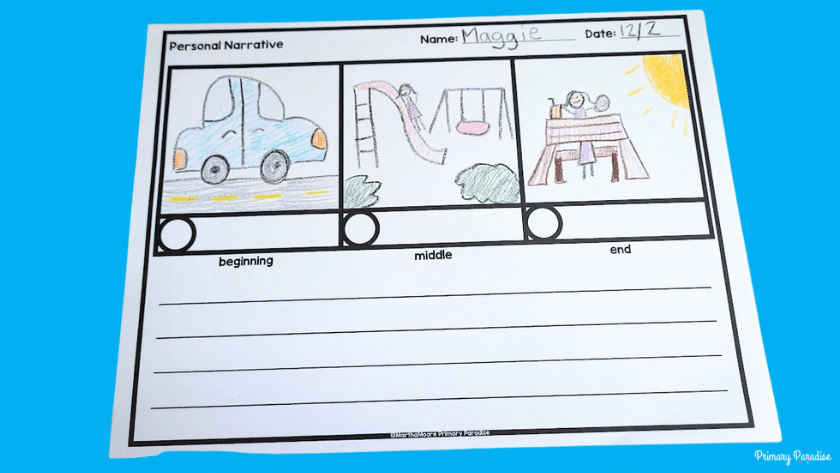
Once we’ve read and retold some narrative stories, it’s time to give it a try. Planning writing is so important, so we start there. First, talk about potential topics. I always tell my students to think about things they do often, such as what they do before and after school, on the weekends, or on special days like birthdays. Then, I model drawing a beginning middle, and end of a personal narrative. I talk through each step and we make sure that the series of events are consecutive and go together. This is where picking something that is routine can be helpful- such as getting ready for school. After I model, I have students draw their beginning middle, and end. If possible, it’s really helpful to allow them to pair up with a partner and tell about their pictures. This helps them find the words for their story.
Step 3: Label It

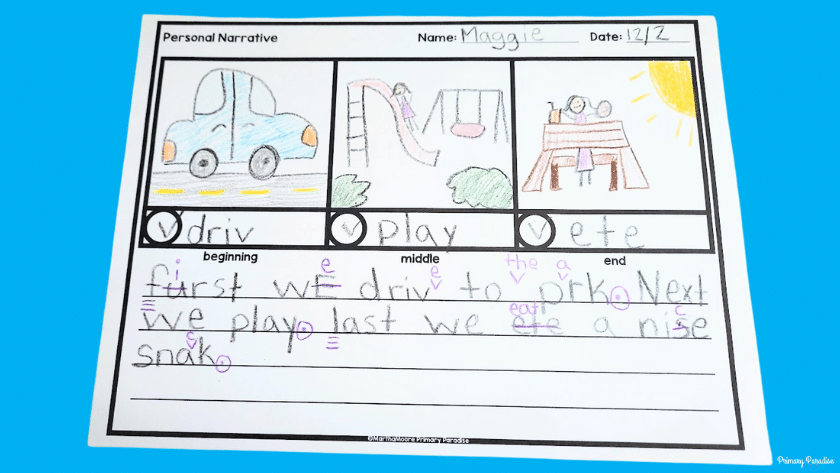
After they have drawn their beginning, middle, and end, I model labeling each of their pictures. We talk about how, when we label, we only need 1-2 words. This is helpful because typically writing a personal narrative will span over many days, so the picture and the label helps them (and me) remember what they’re writing.
When my students are labeling, I ask them to tap out their words and try their best with spelling. I do not spell words for them. This is because I am able to learn a lot about where they are in their literacy journey and understanding by what they can write on their own and how they can write it. For example, if a student writes “et” for eat versus “ete”, I know that the second child is aware that “et” is a short e so there needs to be something else that makes e say the long e sound.
Step 3. Write a First Draft
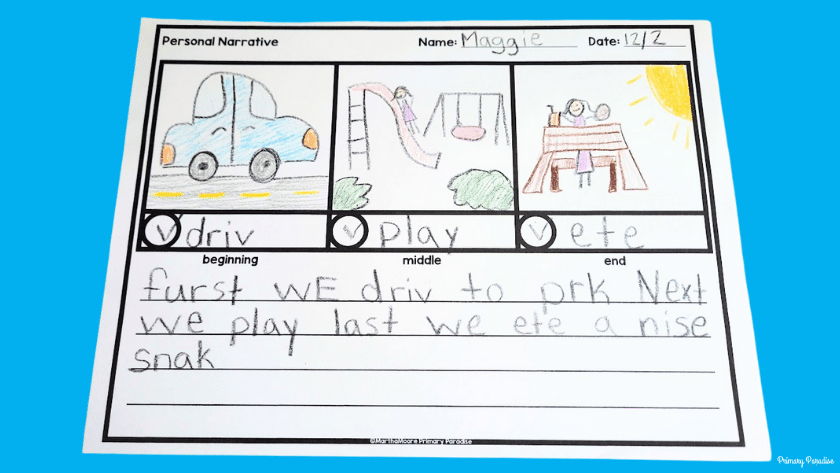
Once my students have labeled their pictures, I model how to write a first draft. I model looking at my picture and label and them using it to write a sentence. When we read narrative writing and create our anchor chart, we talk about using transition words like first, next, and last. We use these words when we retell the stories so they are already familiar and comfortable with them. So, we write first and then a sentence about our first picture. For example, “First I put on my shoes.” I model this for the beginning, middle, and end. One important thing is to add some mistakes in your writing. (This is important for step 5.) I tell my students that I am going to make some mistakes, and we don’t have to worry about them yet because this is just the first draft.
To start, I only ask them to write 3 sentences. One for the beginning, middle, and end. Although eventually we’ll work to writing a introduction and closing sentences, at first I keep it simple. I would much rather my students confidently write 3 sentences than push them to do more before they are ready.
Once I’ve modeled, I have my students write their draft. I will write the transition words on the board for them, or encourage them to look at the anchor chart. As they write each part, they check it off so they can make sure they include each one. Drafting typically takes a full day, sometimes too. Again, I do not spell words for my students at this stage. I want to see what they can do on their own. Plus, it is important for the next step.
Step 4: Editing Your Draft
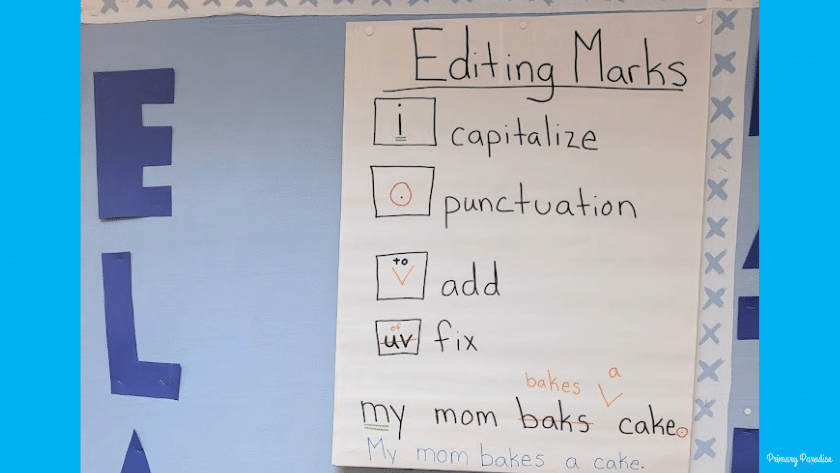
After everyone has written their first draft, I introduce the idea of editing. Together, we create this anchor chart of the different editing marks. Then, we look back together at my first draft. We read each sentence together, and I let my students tell me what mistakes they see. I make sure to have at least one of every common mistake in my writing.
Once we’ve edited my writing, I show them how to rewrite my story to a final draft. We talk about going word by word so we don’t miss any important changes.
Step 4.5: Sit and Edit TOGETHER with Each Student
Once they have helped me edit my writing, I sit with each and every student and help them edit their story. I ask them to read me the story. This is important because I want to make sure they can understand and read what they wrote. After they read the whole thing, I make sure to compliment them on a few things they did really well. Then, we go through sentence by sentence and talk about what things we can fix. I make sure they understand why any changes need to be made. Once we’ve finished, I give them a paper to write their final draft on and they get started right away while it’s fresh in their mind.
If you’re wondering, yes, this takes a long time. Sitting one on one with 25 students takes many days. Sometimes a full week, but this is the most valuable time in the writing process because it gives me a window into where they are, gives me a chance to focus specifically on the areas the student needs, and allows me to encourage them in the areas they’re doing well. Often times, this turns into a one on one mini lesson on capitals, certain spelling patterns, punctuation, etc. It is time well spent, even if it means that it takes 3 full weeks to complete a writing piece.
If you’re also wondering what the other children are doing, that is a great question. It really varies, but typically I meet with students while the rest of the class is working on literacy centers. I also might work on editing writing when they’re working independently on their inquiry work or morning work. Really, any time is fair game. Any time I have a few minutes, I’ll grab a student to edit their writing.
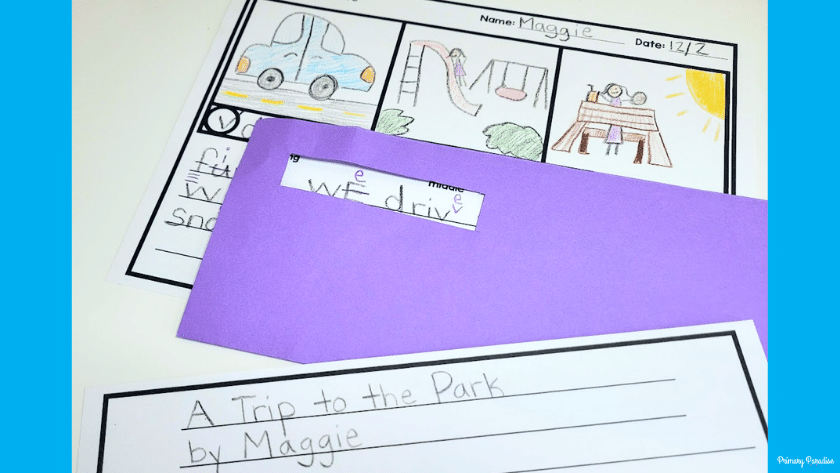
A helpful tip: If your students struggle with tracking when they’re rewriting a rough draft to a final draft, this works like a charm. Cut a piece of construction paper in half, cut a little window, and that’s it! This allows them to only focus on 1-2 words at a time. As time goes on, you can make the window longer, if you want.
Step 5: Publishing and Celebrating
The final step is letting students enjoy the fruits of their labor! After they have all finished their final draft, we take time to share our writing. The first time, I typically have them partner up and share two stars and a wish. Long before we begin narrative writing, I like to share this video about Austin’s Butterfly with my students. It helps them understand the purpose and benefit of getting and giving feedback. We practice giving feedback often, so this is not a new thing for our class. After they share their writing with a partner, I ask willing students to share some of the stars and then some of the wishes they received.
As we continue, sometimes I ask students to share their writing in small groups, with the whole class, or sometimes on Seesaw for their parents. This step is so important, though, because it allows them to feel a great sense of completion and accomplishment.
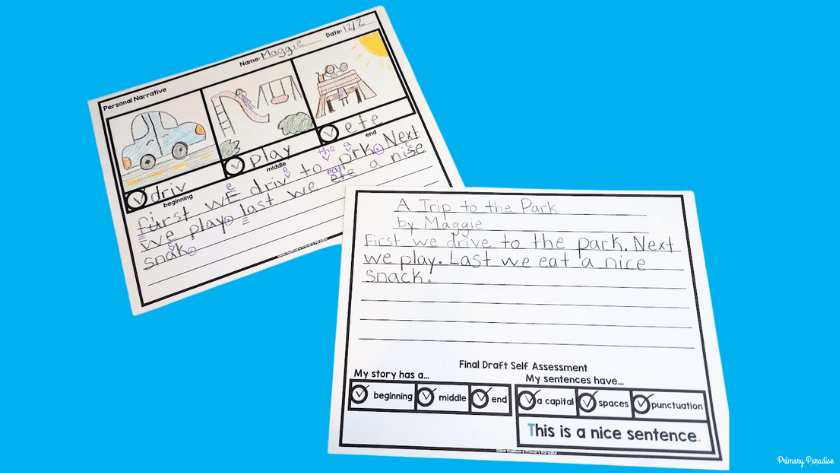
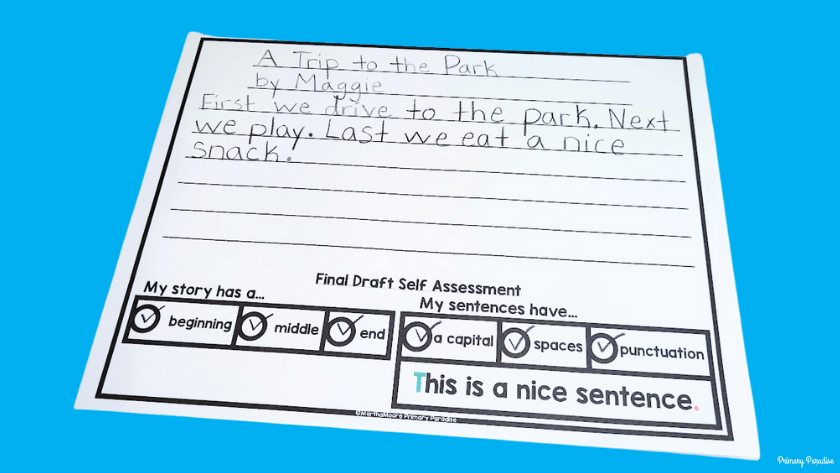
I typically tape or staple the two drafts together so the students can see the progression of their work. They always love to see what they started with and where they ended up! They also enjoy checking off their self assessment when they’re finished.
Step 6: Going Further
You might be wondering, if or when we make more detailed changes. When I first introduce narrative writing, we stick to 3 sentences and just fixing surface errors. With the next writing piece, I encourage my students to add a topic sentence or more details. Each time we work on adding more and more until they have created a story with an introduction, beginning, middle, end and closing sentence. I also encourage them to expand their sentences and add more details. I would rather my students take it slow and really feel confident than to rush and their teacher next year to have to reteach all of this.
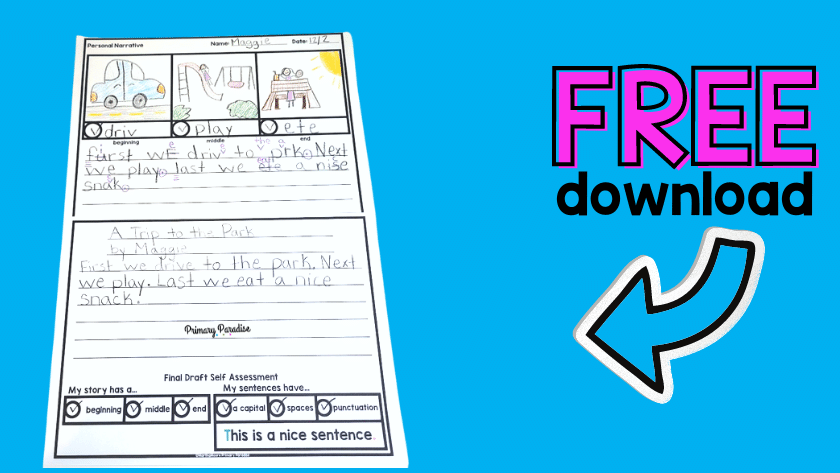
If you’d like the template that I use for personal narrative writing, you can find it in my free resource library for email subscribers. Click the picture below to find it. You can also read more about my year long writing curriculum here.
You might also enjoy:
3 Ways to Build Confidence in Your Developing Writers
Free At Home Parent’s Guide for Supporting Student Writing
Why Strong Sentence Skills Help Students Produce Better Writing
The Easy Way to Teach Students to Expand Sentences